 Save
Save I'll never forget the Easter afternoon when my niece pressed her nose against the kitchen window, waiting to see what I was creating for the celebration. That's when I discovered the magic of The Bunny Silhouette—a dish that transforms simple, colorful ingredients into a whimsical centerpiece that makes everyone smile. It started as a playful idea to make something both beautiful and delicious, and now it's become our family's most anticipated spring tradition.
I remember the moment my sister's face lit up when she saw the finished bunny surrounded by family at Easter dinner—the blueberry eyes seemed to sparkle under the light, and suddenly everyone was reaching for their cameras before reaching for their plates. That's when I knew this dish was special; it wasn't just about the flavors, but about the joy of gathering around something made with playfulness and care.
Ingredients
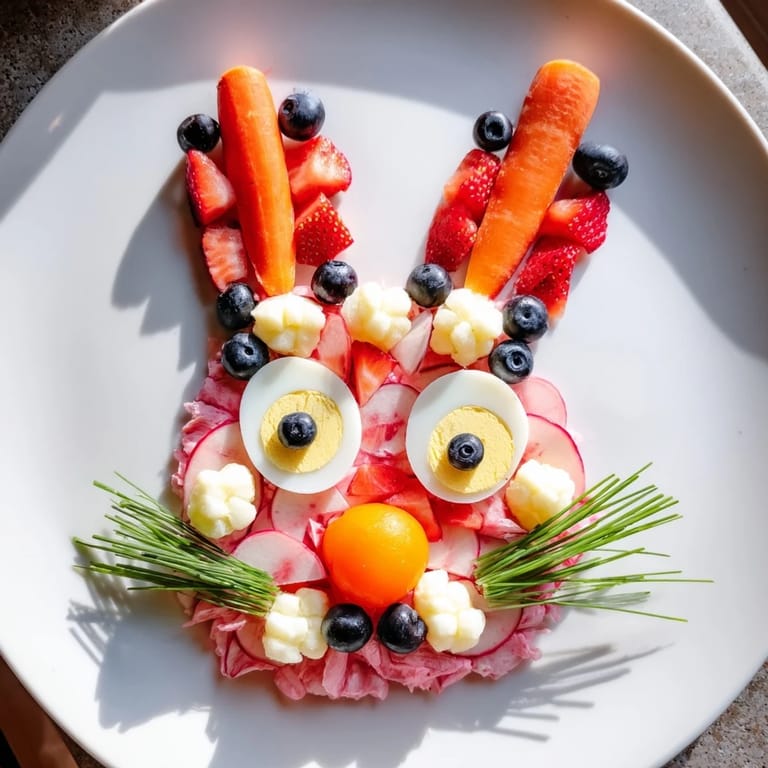
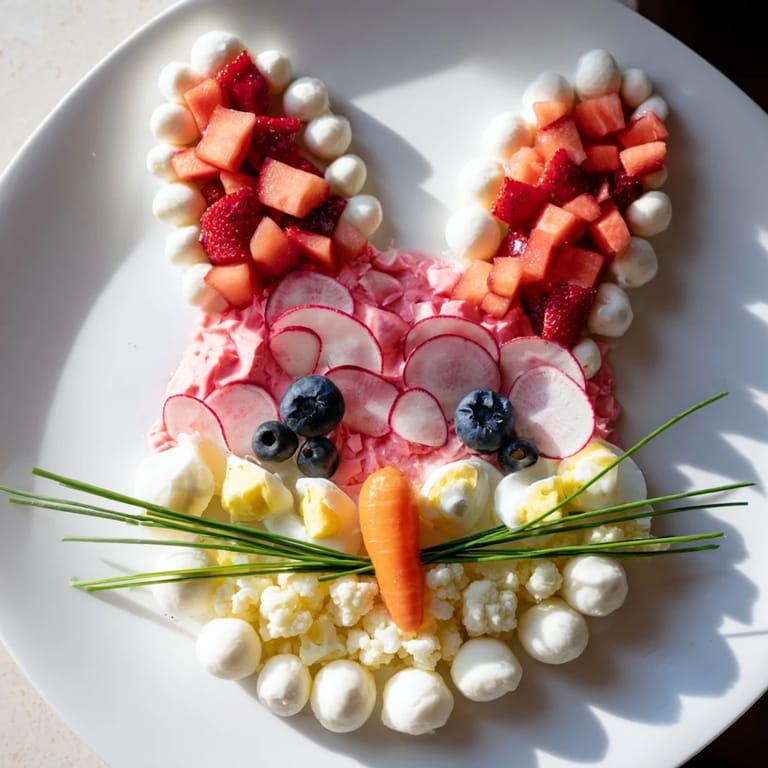
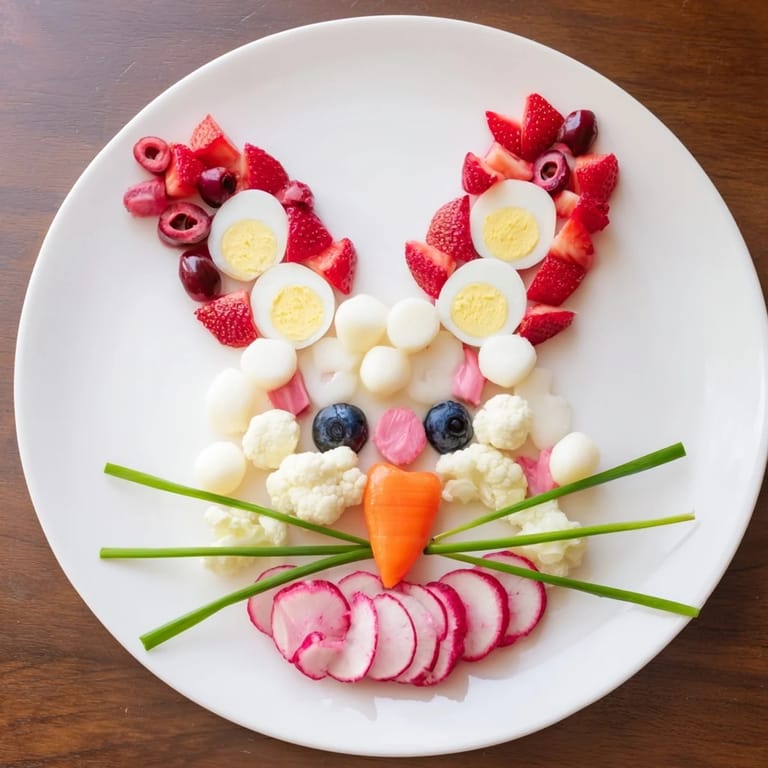
- Black olives: These create the outline and structure of your bunny, giving the whole design definition and character. I learned to use a mix of whole and sliced olives so they stay in place better while still giving you that lovely contrast
- Strawberries and watermelon: The stars of the pink sections—choose ripe ones and dice them into similar-sized pieces so the colors look intentional and vibrant, not haphazard
- Pink beet hummus: This is your secret weapon for achieving that rosy hue while adding creaminess and earthiness that anchors the pink elements
- Radish slices: These add a peppery snap and their natural pink edges intensify the color story; don't skip them even though they seem simple
- Mini mozzarella balls: The foundation of your white sections, they're delicate and won't overwhelm the palate like harder cheeses might
- Cottage cheese: Spread it gently to create creamy patches that contrast beautifully with the balls and other textures; drain it well so it doesn't weep liquid onto your platter
- Hard-boiled eggs: Slice them right before assembling so they stay pale and perfect; they add protein and a familiar comfort to the composition
- Cauliflower florets: These keep things light and provide that important vegetable element while reinforcing the white palette
- Chives, carrot piece, and blueberries: The finishing touches that bring personality—the chives become whiskers, the carrot is a sweet nose, and the blueberries are where the magic happens as eyes
Tired of Takeout? 🥡
Get 10 meals you can make faster than delivery arrives. Seriously.
One email. No spam. Unsubscribe anytime.
Instructions
- Set your canvas:
- Lay out your parchment paper or platter on a table where you can work without bumping it. Take a moment to visualize where your bunny will sit—I like to imagine where the head will be, about two-thirds of the way across, leaving room for those long ears to stretch out comfortably
- Create the olive outline:
- Using black olives as your pencil, draw a clear bunny head with long ears pointing upward. Don't worry about perfection; think of this like sketching with your hands. The olives should form a border that's visible and confident, maybe about half an inch thick. Step back and admire your bunny's silhouette—this is the frame for everything that comes next
- Paint the ears pink:
- This is where artistry meets appetite. Take your diced strawberries, watermelon, radish slices, and pink beet hummus and create layers within the ear sections, alternating colors as you go. Think of it like watercolor—let some colors blend slightly at the edges while keeping distinct patches of strawberry red, watermelon pink, and that gorgeous beet magenta. The textures should vary so there's visual interest
- Fill the face with white elegance:
- Now for the bunny's sweet face. Arrange mini mozzarella balls in clusters, spread cottage cheese in creamy sections, fan out your hard-boiled egg slices, and nestle cauliflower florets like little clouds. Play with the arrangement until it feels balanced—not too bunched, but filling the space generously
- Add the features:
- This is the moment your bunny comes alive. Press two blueberries gently into place for eyes—they should feel like they're looking at you with curiosity. Add the carrot piece for a sweet nose right between the eyes. Arrange thin strips of fresh chives radiating outward like whiskers that show character
- Chill and serve:
- Cover gently with plastic wrap and refrigerate until your guests arrive. When it's time, set it on the table surrounded by crackers or vegetable sticks, and watch the smiles spread across every face as they realize what they're looking at
 Save
Save The real magic happened when my grandmother, who usually just watches from the sidelines, asked if she could help arrange the final elements. As we placed those blueberry eyes together, laughing at how our bunny seemed to wink back at us, I realized that sometimes the best dishes aren't just about taste—they're about the moment you create together.
Color Theory That Actually Tastes Good
The pink and white division isn't just pretty; it's also a gentle way to organize flavors. The pink side leans toward fresh, fruity, and brightly acidic, while the white side offers creaminess and mild richness. Together, they create a complete experience on every bite. When you're arranging, think of yourself as a painter—darker ingredients on the edges provide shadow, while lighter elements in the center create luminosity. The blueberry eyes become a focal point that draws the eye naturally to the bunny's face, just like real eyes would do.
Timing and Preparation Wisdom
The beauty of this recipe is that you can prep individual components hours in advance. Chop your vegetables, hard-boil your eggs, and arrange your little bowls of ingredients in the morning. Then, 30 minutes before guests arrive, assemble the bunny in one relaxed sitting. I've found that if you're not rushing, you make better design choices and the whole process becomes meditative rather than stressful. If you're serving this at a party where timing is tight, the zero-cooking aspect becomes your superpower—just assemble and you're done while everyone else is still cooking.
Making It Your Own
This recipe is a canvas for your creativity and your dietary needs. Swap in raspberries or pink grapefruit pieces instead of strawberries if that's what's in season or what you love. Use vegan cheese alternatives for friends who don't eat dairy—the design works just as beautifully. Gluten-free? Serve with whatever crackers work for your table. I've made versions with goat cheese, with roasted beets instead of raw ones, and once even with pink dragon fruit. Each time, the bunny is just as charming and the flavors tell a different story.
- Remember that the olives are just a guide—you can use them loosely or make them precise depending on your mood and artistic vision
- Fresh ingredients are crucial here since there's no cooking to improve them; choose the best-looking vegetables you can find
- If you're making this more than a few hours ahead, cover it well and the arrangement will stay perfect in the fridge for up to 6 hours
 Save
Save This bunny has become more than a recipe in our family—it's a tradition that says spring has arrived and we're ready to celebrate together. Whether you're gathering for Easter, a spring birthday, or just because you want to bring joy to your table, this simple arrangement will do exactly that.
Recipe FAQs
- → How is the bunny shape created?
The outline of the bunny head and ears is formed using whole or sliced black olives placed on a large platter or parchment paper.
- → What ingredients give the pink color in the dish?
The pink effect comes from layers of diced strawberries, watermelon, pink beet hummus, and radish slices arranged within the ear sections.
- → Which fillings create the white sections of the silhouette?
Mini mozzarella balls, cottage cheese, hard-boiled egg slices, and cauliflower florets fill the face area for a white appearance.
- → How can this dish be adapted for a dairy-free diet?
Swap mozzarella and cottage cheese with vegan cheese alternatives to make the platter dairy-free without compromising texture or flavor.
- → What garnishes are used to enhance the bunny shape?
Blueberries serve as eyes, a small carrot piece forms the nose, and finely chopped fresh chives create whiskers, adding charming details.
- → What are some suitable serving suggestions?
Serve chilled alongside crispbread, gluten-free crackers, or vegetable sticks, and pair with light sparkling rosé or elderflower lemonade for a refreshing complement.